Setting up ESLint and prettier with VS Code in 2019
Published -
Setting up ESLint and prettier can be confusing at first, especially with VS Code. It was for me when I first started out. I was confused by the ESLint and prettier plugins in vscode and how they integrated with the linters, but things have been much more simplified in 2019. I was also confused by eslint-plugin-prettier and eslint-config-prettier..what is the difference? And when you setup the ESLint config file, what is being used where?
Hopefully this short tutorial will help clear up some confusion and point you in the right direction if you’re just starting out.
Getting started
Here’s a short brief on what linting and ESLint are about if you’re new to it.
“Code linting is a type of static analysis that is frequently used to find problematic patterns or code that doesn’t adhere to certain style guidelines…”
“Linting tools like ESLint allow developers to discover problems with their JavaScript code without executing it.”
Source: https://eslint.org/docs/about
To start, create a new repository and run npm init -y to initialize a package.json file
Eslint
Install eslint with the following command
npm install --save-dev eslint
Create a .eslintrc.js file in the root of your repository.
This is the file that holds all the settings/rules that will run against your javaScript code and it is usually placed in the root of your repository. If you want to place it somewhere other than the root, make sure to use the -c flag and specify the path of your ESLint config file when executing ESLint.
Example: eslint -c /some/path/myEslintConfig.json myfiletotest.js
You can read more about ESLint Configuration Cascading an Hierarchy if you want to use different ESLint files for different subdirectories in your project.
An example of an ESLint config is as below.
// Sample .eslintrc.js
module.exports = {
  parser: "esprima", //default parser
  parserOptions: {
    ecmaVersion: 10,
    ecmaFeatures: {
      jsx: true,
    },
  },
  env: {
    browser: true,
    jest: true,
  },
  plugins: ["react", "prettier"],
  extends: ["prettier", "react-app"],
  rules: {
    "no-unreachable": "error",
    "no-console": "error",
  },
};
The most common configuration keys you’ll use are:
parserparserOptionsenvpluginsextendsrules
You can read more about configuring ESLint and the various options in the docs
In this simple tutorial, we will only be configuring plugins, extends and rules
Prettier
Prettier is an opinionated code formatter. Meaning it takes care of code’s spacings, line breaks, max line lengths etc.
Install prettier with the following command
npm install --save-dev prettier
Create a .prettierrc.js file in the root of your directory. This is where we will include all our desired prettier rules.
//.prettierrc.js
module.exports = {
  printWidth: 120,
  trailingComma: "es5",
  tabWidth: 2,
  semi: false,
  singleQuote: true,
};
See more configuration options at Prettier’s site
Prettier config
Some of the recommended rules by ESLint are code formatting rules that clash with prettier. For example, max length of lines or usage of double/single quotes. Since we are using prettier for our formatting, we want it to have priority in determining the format.
The eslint-config-prettier is a config by prettier that contains a set of rules which turns off/overrides the clashing ESLint rules.
To install, run npm install --save-dev eslint-config-prettier
To add this, insert prettier into the extends array. Add this at the end of the extends array in order for it to override all other configs.
//.eslintrc.js
module.exports = {
  extends: [
    "prettier", //highlight-line
  ],
};
We can use prettier in the extends field because ESLint recognizes the eslint-config- prefix automatically.
Prettier plugin
eslint-plugin-prettier is a plugin that allows ESLint to run prettier as a rule.
To install, run npm install --save-dev eslint-plugin-prettier
Add this plugin to your .eslintrc.js in the plugins array.
Add the prettier rule in the rules object
//.eslintrc.js
module.exports = {
  plugins: ["prettier"], //highlight-line
  extends: ["prettier"],
  rules: {
    //highlight-line
    "prettier/prettier": "error", //highlight-line
  }, //highlight-line
};
Just like the eslint-config- prefix, the reason why we use prettier here and not eslint-plugin-prettier is because ESLint recognizes the eslint-plugin- prefix automatically.
If a prettier rule is broken, there will be an ESLint error under the name prettier/prettier because we are running prettier as a rule in ESLint.
Running ESLint
Create a file called ugly.js in the root with the following content
//ugly.js

//Note all the inconsistent spacings, the semicolon and the use of console.log
function someUglyFunction(x, y, z) {
  if (z) {
    const a = x + y;
    return a;
  }
  console.log("this is bad");

  return x - y;
}
In your package.json, include the following script
{
  "script": {
    "eslint": "eslint ." // this will run eslint on all files
  }
}
In your terminal, navigate into your repository and run npm run eslint
You should get an output in the terminal that looks something like the following:
  1:26  error  Replace `·(x,y,·z·` with `(x,·y,·z`  prettier/prettier
  2:5   error  Replace `(·` with `·(` prettier/prettier
  3:16  error  Replace `+y;·` with `·+·y` prettier/prettier
  6:3   error  Unexpected console statement no-console
  8:13  error  Insert `·` prettier/prettier
  9:2   error  Insert `⏎` prettier/prettier

✖ 6 problems (6 errors, 0 warnings)
  5 errors and 0 warnings potentially fixable with the `--fix` option.
If you see this, congrats! You’ve successfully configured ESLint and Prettier!
In this log, we see that we have lots of prettier errors prettier/prettier and one ESLint error no-console. We will get to fixing all these errors in the following sections and explain the --fix option by ESLint
VS Code Settings
In VS Code, we can integrate fixing linting errors like the ones in the previous section as part of our workflow when we save files.
To integrate ESLint and Prettier into your VS Code workflow, you should install the Eslint VS Code extension
Note: In the past, the Prettier extension should also be installed to integrate with the ESLint extension. But now, it is recommended to run prettier via an ESLint configuration, which we have already done above. If you already have the Prettier extension installed, it shouldn’t cause conflicts with the configuration we have done so far. If you do have conflicts, try to update your Prettier extension
After installing the ESLint extension, you’ll start to see red wavy underlines which indicate errors
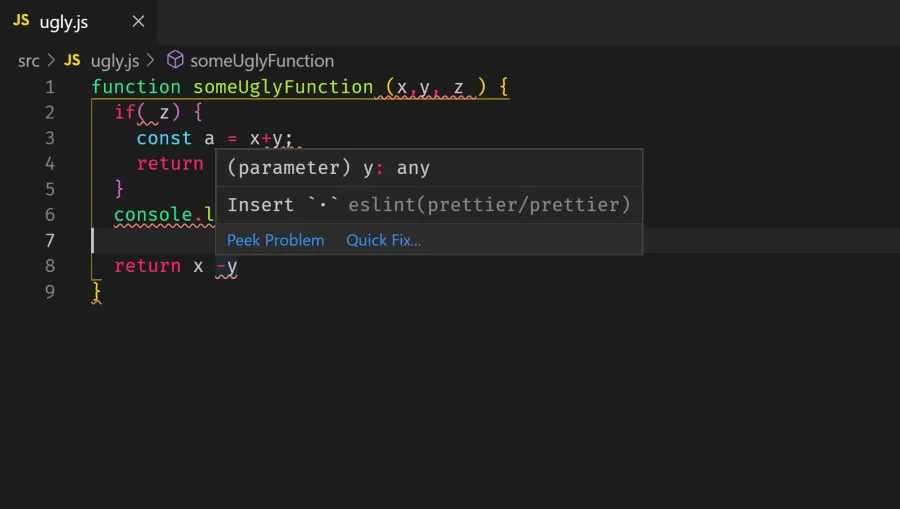
(Insert '.' means insert a space)
w
Go to your VS Code JSON settings by using the command palette.
Press CTRL + SHIFT + P on windows or ⇧+⌘+P on mac to open the command palette. Next, type in Open Settings(JSON) and enter. Your settings.json file should open.
Insert the following:
{
  "eslint.autoFixOnSave": true,
  "eslint.run": "onSave"
}
When you save your file, the ESLint extension will run with the config we have set in the above section and also try to fix any errors that occur. Essentially, whenever you save your file the eslint --fix fileBeingSaved.js command will run.
Now try saving ugly.js again and see how the spacings in the file are fixed. It should look something like below:
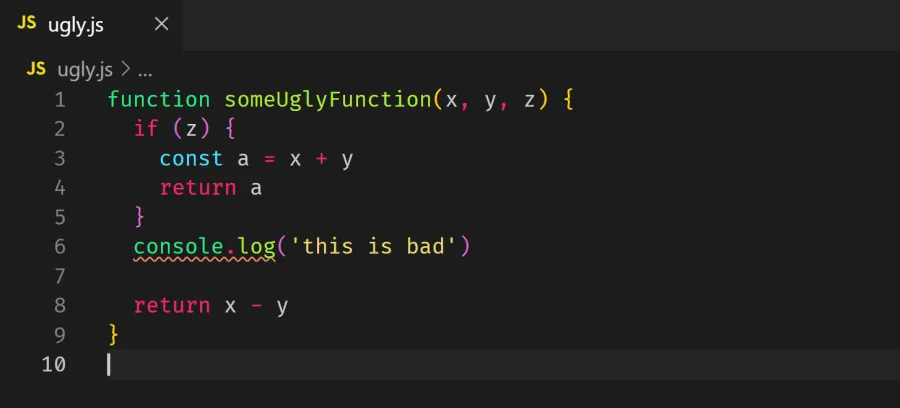
All the red wavy errors are gone except for the one at console.log. This is because ESLint was not able to fix that error. To fix that error, we have to manually remove that console.log from our file.
If you wish to run the fix via the command line, you can. In your package.json add the following in script:
{
  "script": {
    "eslint:fix": "eslint --fix ." // lint all files and attempt to fix all errors if any
  }
}
In your terminal, run npm run eslint:fix. All files will be formatted and ESLint will try to fix all errors.
Bonus - Integrating husky and lint-staged
Husky is a tool that helps to create git hooks easily while lint-staged allows us to run scripts on files that have been staged in git.
In this bonus section, we will use husky to create a pre-commit git hook that runs lint-staged which in turns runs ESLint to lint our staged files before they are committed.
Install husky and lint-staged with the following command.
npm install --save-dev husky lint-staged
In your package.json, add the following lines:
{
  "script": {
    "staging-eslint:fix": "eslint --fix" // this does not have the '.' at the end of the command
  },
  "lint-staged": { "*.{js, jsx}": ["npm run staging-eslint:fix", "git add"] },
  "husky": {
    "pre-commit": "lint-staged"
  }
}
The husky setting will create a pre-commit hook that runs lint-staged
The lint-staged setting will run the staging-eslint:fix script on any staged *.js or *.jsx file. Once all the files have been fixed, the fixes will be added to staging via git add. Next, all staged files will be committed.
Now try making some bad changes to a .js file (eg. add some inconsistent spaces), save it without formatting, stage it and commit. In the terminal, you will see lint-stage being executed and the file with bad changes will be fixed.
Tip: To save without formatting, open the command palette and search for
Save without Formattingand press enter. This will save the file but no formatting will be made.
Conclusion
ESLint is an integral part of any JavaScript developer’s toolkit. It helps to detect patterns that are not part of a certain guideline and helps to prevent any potential bugs that may occur before run time. With Prettier, your code base will be more organized and everyone will follow a certain style of formatting. Your git diffs will be less about spacings or single/double quotes and more about the logic.
If you’re not using ESLint/Prettier already, I highly recommend it to help with the housekeeping of your code. Life will be better 😂